Illustrator tutorial: The Blend Tool
Posted: in Design, Tutorials
In the third part of our Illustrator Tutorial series we’re taking a look at the blend tool. Everybody loves blending.
Fortunately, the Illustrator blend tool doesn’t require you to destroy any expensive gadgets, just vector shapes. Here’s one we blended earlier:
To try out the blend tool start by creating two shapes you want to blend. They both need to be vectors – if you want to blend photos of your friends there’s other software for that. Select the blend tool, click on the first shape, then on the second, and let the blend tool work its magic.
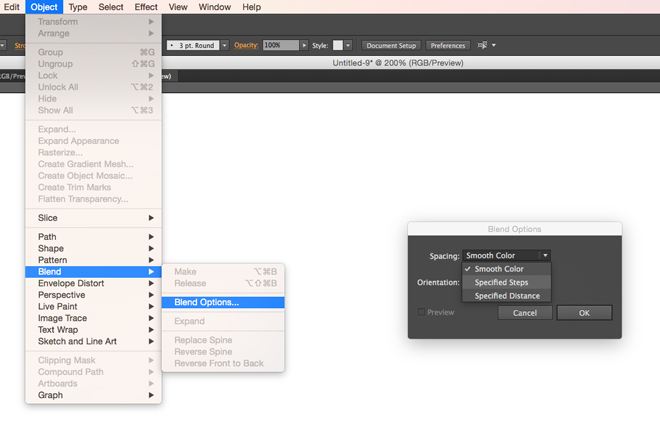
In return for your endeavours Illustrator creates a smooth transition from one shape to the other, generating a fill and stroke colour gradient. But what if you want to specify the number of steps of the transition? No problem; just dig inside the blend tool options. Select Object > Blend > Blend Options or simply double click on the blend tool icon in the tool bar. Choose your preferred option from the pop up menu and then proceed to clicky click blend your shapes together as before.
You can also force the new shapes to be generated at a specific distance between each other:
The versatility of this feature doesn’t end here. You can edit the final result by adjusting the straight line on which the shapes are placed. With the anchor point tool change the curve angle to modify the position of the shapes.
So there you go, blending fun for the whole family!
![pic-1-[smooth-colour]](https://news.diginate.com/wp-content/uploads/2015/04/pic-1-smooth-colour.gif)

![pic-3-[spec.-steps]](https://news.diginate.com/wp-content/uploads/2015/04/pic-3-spec.-steps.gif)
![pic-4-[spec-distance]](https://news.diginate.com/wp-content/uploads/2015/04/pic-4-spec-distance.gif)
![pic-5-[advance-control]](https://news.diginate.com/wp-content/uploads/2015/04/pic-5-advance-control.gif)


